Glossary
Absolute Scale Cutting:

To cut a scale to length:
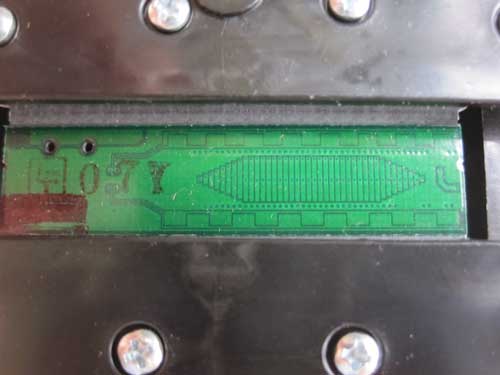
- For Models 150 and 250 (green zig-zag pattern shown above): Identify the end of the scale that is painted black - DO NOT CUT THIS END OFF!
- Mark the scale where it will be cut.
- Use parallel clamps or vice-grips to clamp the embedded stainless steel wires in place.*
- Cut the extrusion to length. Cut into the side with the green circuit board first.
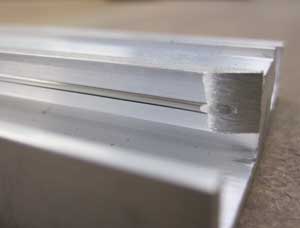
- Chamfer the cut end of the extrusion to match the original. This is most easily accomplished using a belt sander.
- Deburr the aluminum extrusion.
- Test the shortened scale by carefully sliding an Encoder on it. There should not be any binding.
*Some scales manufactured after February 2008 may not have stainless steel wires, and this step can be skipped.
Absolute Measurement
An absolute measurement is the distance from some fixed position. On a digital caliper, this is the opening between the jaw faces. On a table saw, this is the distance from the right edge of table saw blade to the fence. On a sander, this is distance of the sanding media to the bed of the machine. On ProScale readouts, the absolute distance can be set to zero (or to a pre-programmed value other than zero) by pressing the DATUM key. The absolute distance *is* retained when the readout is turned off, and when the readout is switched into Incremental measuring mode.
Absolute Technology
Our Absolute encoder technology (ABS) was in production 1996-2022. Absolute Technology measures the actual sensor position by reading a pattern that is unique at any given location over its length. This results in a measuring system with a high immunity to loss of position due to motor electrical noise, power transients, magnetic fields, etc. With absolute encoder technology, there is no position loss when the digital readout is turned off, or if power is interrupted. ABS technology was used in several products, including the Model 150 and Model 250 ProScale systems. It is especially appropriate for environments with high voltage wiring, dust collection systems, and machinery installations where a zero position cannot be quickly re-established.
Components of an Absolute (Model 150/250) measuring system:
Absolute Scale (green & black pattern):

The aluminum extrusion for the Absolute digital scale is available in several different sizes:
- 0.75" wide x 0.25" thick is Model 150
- 2.02" wide x 0.75" thick is Model 250
Absolute Encoder:
|
|
|
|
|
Case color varies |
Arrow points to the Black |
Inside of encoder |
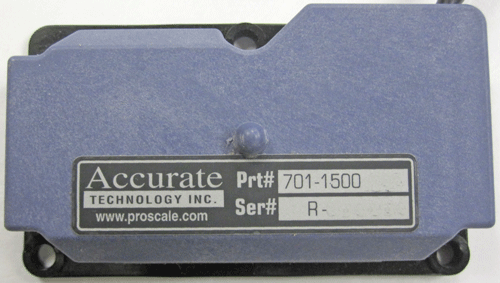
- Note the wire exits from the corner on one end of the housing. (Older or custom encoders may have a flat gray cable)
- Until May, 2011 the housing is gray. After May 2011 the housing is Blue or black.
- The base is black. (Pre-2012 models may have a gray base).
- Newer models (since 2004) have labels that show the part number and serial number.
- A "C" or "V" in the part number indicates a coiled cable.
- An "H" in the part number indicates an encoder with a higher slew rate.
- A "G" indicates an encoder used in a system that is operated with 12-24VDC, or in a system with a wired external connection for input/output.
- An "S" indicates encoder is used with a Model 550 System.
- Standard cable lengths are available up to 360 inches. (ProRF transmitter can be used for longer ranges.)
Accuracy
The accuracy of a measurement system is the degree of closeness of measurements to its actual (or true) value.
See: "Accuracy and precision," Wikipedia, The Free Encyclopedia
Abbé Error
Abbe error is a condition that may not be visible to the human eye, but will affect linear measurements. Be sure to take precautions when installing ProScale in order to eliminate the possibility for Abbe error.
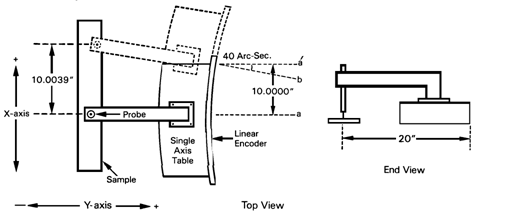
Abbe error refers to a linear error caused by the combination of an angular error and a dimensional offset between the sample and the measuring system. It is important to understand that the information the encoder is providing is only the position of the Encoder on the scale. To illustrate this, see the figure, which shows a linear measuring device. (The distortion in the measuring device is intentional for this example to show the measuring device with a curvature in its mounting.)
Suppose the curvature in the figure is sufficient to produce an angle of 40 arc-seconds. If the measuring device moves 10 inches, the probe will be found to have moved 10.0039 inches, resulting in an error of +0.0039 inches. Abbe error could be lessened by moving the measuring system closer to the sample. This effectively solves one half of the Abbe error problem (offset) and leaves only the angular mounting problem to be solved. Angular error can best be countered through proper design and placement of the linear scale. Sources of angular error include:
- Mounting the linear scale to an imperfectly flat surface.
- Mounting the linear scale to an imperfectly straight surface.
- Curvature of ways (or linear bearings) used to measure the sample.
- Contaminants between the probe and item being measured.
- Friction in any part(s) of the measuring device.
Capacitive Incremental Technology
![]()
Our Capacitive Incremental measuring technology was made 1989 to 2009. Incremental technology measures the distance it has traveled relative to a starting point. As long as the signal is not reset or interrupted (by removal of batteries, electrical motor EMI, power transients, magnetic fields, static, etc.), the position information is not lost. Incremental technology was used in all of the measuring systems we manufactured until 1997. We began to phase out this technology in favor of more advanced Inductive Technology in 2007, and production was ended in 2009. Products using this technology are no longer manufactured.
Fractions
Most ProScale offer fractional inch displays. The user can choose to see measurements in 16ths, 32nds, or 64ths. The digital readout automatically reduces fractional readouts to 4ths, 8ths, etc, in each mode. Additionally, bars appear in the upper right corner to show extra 64ths when in 16ths or 32nds mode.
For example, when set to 16ths mode at 19/64", the digital readout will show 1/4" and three bars appear in the upper right corner, each indicating an additional 1/64" distance.
In 32nds mode, the readout will show 9/32" and one bar appears in the upper right corner.
In 64ths mode, the readout will show 19/64.
This allows you to continue using the units you are familiar with, without making mistakes. It also speeds up cutting parts 'heavy' or 'long' when intended.
NOTE: By default, fractional values only appear when a particular dimension is reached. For example, you must actually reach 0.500 for the readout to show 1/2" in fractions mode. This prevents cutting parts too small -- especially important in work where parts stack or build together. This behaviour can be overridden in the programming/customization menu.
See more in a video at:https://www.youtube.com/watch?v=iUhntdc4YT8&t=1s
Inches
Most ProScale readouts allow for the display of more/less decimal places. By default, ProScale readouts read to 3 decimal places. The reading increments by 1 unit when showing 1, 2, or 3 decimal places. For example, while counting up, readings will display as 0.001, 0.002, 0.003, 0.004, 0.005, etc.
Incremental Scale Cutting:
 |
or |  |
To cut your incremental type scale (Models 180/190, 280/290, 380/390, 580/590) to length, follow these simple steps:
- Mark the scale where it will be cut. It can be anywhere!
- We recommend keeping the end with the part number label when possible.
- Cut the extrusion to length. Cut into the side with the blue or black circuit board side first.
- Deburr the aluminum extrusion.
- Test the shortened scale by sliding a Encoder on it. There should not be any binding.
Inductive Series I Technology
![]()
Our Inductive Series I Incremental measuring technology was in production 2007-2013. Inductive measuring technology measures the distance it has traveled relative to a starting point. It was a more robust technology than the Capacitive Incremental technology we used previous to 2007. Its signal is more immune to electrical motor EMI, power transients, magnetic fields, static, so the position information is not lost as easily as the older technology. Inductive Series I production ended in June 2013. Products using this technology are no longer manufactured.
Inductive Series II Technology
![]()
Our Inductive Series II Incremental measuring technology began production in June 2013. This technology, and the systems manufactured using it, are direct (mechanical) replacements for Series I systems. Series II is more robust technology than Series I. Its signal is more immune to power transients, magnetic fields, and ESD. Plus, the slew (movement rate) is greatly increased. Series II technology is used in ProScale Models 190, 290, 390 and 590 as well as many of the turn-key measuring systems we manufacture.
Version 2b production starts in July 2023 and will offer even better ESD protection, plus a built-in battery on the encoder that will preserve its position information while the battery in a readout is changed.
The aluminum extrusion for the Series II SCALE is available in several different sizes:
- 0.75" wide x 0.25" thick is Model 190
- 2.02" wide x 0.75" thick is Model 290
- 0.75" wide x 0.75" thick is Model 390
- 2.99" wide x 0.61" thick is Model 590
Inductive Encoder
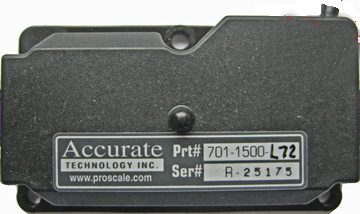 |
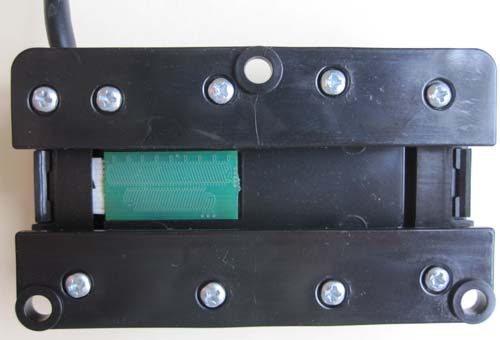 |
| Top View | Bottom View |
- Note the wire typically exits from the corner on one end of the housing.
- The housing is black with a black base.
- A label shows the part number and serial number.
- Stock cable lengths available up to 360 inches. (ProRF transmitter can be used for longer ranges.)
Incremental Measurement
An incremental measurement is a point-to-point temporary distance. In your car, this is how the distance shown on the tripmeter - reset each time you fill up with gas. On a digital caliper, Incremental can be used to compare a part/measurement to a master part. On a table saw, this could be the distance between dados or grooves. The incremental distance can be set to zero, or to any other value, quickly and easily using the readout keypad. Changing between Absolute and Incremental modes is easily done by pressing a single key. The incremental distance is retained when the readout power is off.
Millimeters
Most ProScale readouts allow for the display of more/less decimal places. By default, ProScale readouts read to 2 decimal places in millimeters. The reading increments by 1 unit when showing 1 or 2 decimal places. For example, while counting up, readings will display as 0.01, 0.02, 0.03, 0.04, 0.05, etc.
Repeatability
The precision of a measurement system, also called reproducibility or repeatability, is the degree to which repeated measurements under unchanged conditions show the same result.
See: "Accuracy and precision," Wikipedia, The Free Encyclopedia
RoHS Compliance
The RoHS directive aims to restrict certain dangerous substances used in electronic equipment. Any RoHS compliant component is tested for the presence of Lead (Pb). There must be no more than 0.1%. And, any RoHS compliant component must have 100 ppm or less of mercury. All ProScale products conform.
SPC
SPC (short for Statistical Process Control) is a tool that businesses and industries use to achieve quality in their products and/or services. By monitoring the accuracy, or in-tolerance percentage of manufactured products, and collecting current measurement data from measuring devices, a company can adjust their processes and machines to produce better products, faster. Most of our measuring products may be integrated into a company's SPC program. This serial connection uses the format called Mitutoyo Digimatic® for the transmission of measured values or positions. Our encoders carry this signal to our digital readouts. Most of our digital readouts also have a 10-pin output connector which can be used to transmit the currently displayed reading. These signals may be gathered using our Data Interface Products.

